Here we are, back to the buttonhole - the stitch of this month! I call it the most versatile among all of the hand embroidery stitches, and there is a reason for that. As I mentioned earlier, the buttonhole stitch can be used for attaching an applique to the fabric and for creating an outline or a border (using the variations of the buttonhole stitch). But the versatility of this stitch doesn't end here!
It can also be used for filling in ALL kinds of shapes! And you can vary the look of the result by changing the density of stitches. The bright side of using buttonhole stitch as a filler, that I especially appreciate, is that it doesn't only fill in the shape, but also creates an outline ;)
Now, let's get to the business and see how the buttonhole stitch works as a filler.
Circle shape ( + square)
Start your buttonhole
stitch in any place you want. In case you forgot, you can take a look
at a basic buttonhole stitch tutorial. We
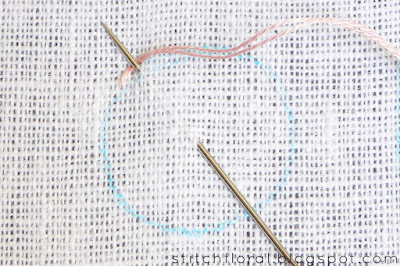
start by bringing the needle up through the fabric on the outline of
the shape and piercing the fabric in a point below – in case of
stitching a circle, choose a point
in the center of the
shape – then bring the needle up again on the outline of the circle
shape, stepping a little aside from the first point.
Continue
stitching always going back to the center point as you stitch.
When
it is time for the ends to meet, slide the needle under the first
stitch and bring the needle down through the center point. This will
make the joint less apparent.
The
same way you can fill in a square shape!
A
buttonhole stitched circle is often referred to as “buttonhole
wheel”. Makes sense, right? It does look like a bicycle wheel with
those spokes. So, if you ever want to stitch a tiny bicycle – and these
motifs are quite popular nowadays, – remember this stitch ;)
But,
of course, wheels are not the only thing you can stitch using this
technique. How about circle-shaped florals? Actually, buttonhole can
be used as a filler for flowers with any shape!
Flower shape
My
favorite one! Love, love, love buttonhole stitched florals. That's my
weakness. They come out just so cute and... a little quirky??
The
process is basically the same, though. Choose the center of the
flower (actually, I sometimes use two neighboring holes, switching
between them as I go) and start stitching in the same way as you
would with a circle shape.
And
when you finish, slide the needle under the first stitch to hide the
joint.
I
used buttonhole stitch for filling the tiny creamy flowers in the
Winter Joy design (click the link to see pictures of higher resolution):
Heart shape
Want
to stitch a lovely heart? Try to fill it with buttonhole stitch!
Start
from the center, making your first stitch a lazy daisy:
that means making a loop and coming to the front of the fabric inside
of it.
Then
continue working buttonhole stitch following the outline of the
shape...
...and
anchor the last loop.
Here
I used the center of the shape as the point where all the stitches
would meet, but you can change it to your liking. For example, in the
picture below the “center” point was higher. That's from the textile baggy I've sewn recently.
If
you don't like the look of the “hole” inside the shapes, you can
place there a french knot
or a bead!
Crescent shape
Here,
we can also start with a tiny lazy daisy stitch...
...and
then continue with buttonhole stitching.
The
last loop can be anchored with a tiny running stitch.
The
reason I showed how to fill in a crescent shape is because buttonhole
can often be used for festons, garlands, banners and similar borders.
For instance, I used buttonhole for the leaf border in theCrewel Heart:
Leaf shape
There
are two ways to fill the leaf shape with buttonhole stitch: starting
from the bottom or starting from the top. But the principle is the
same.
When
you start from the bottom....
Make
a lazy daisy stitch, and then continue working buttonhole
stitch all the way up.
And
anchor the last loop with a tiny running stitch making the leaf top
sharp.
When
you start from the top, follow the same steps: make a lazy daisy
stitch at the top of the flower, putting its two base points on the leaf 's outline. And then continue working buttonhole stitch till you
arrive at the bottom of the leaf, where you need to anchor the last
stitch.
As
you might see, the difference will be in the place of the “ground
line” of your buttonhole. Either it will be placed on the outline
of the leaf, or it will create a center vine (which will become a
double vine when you fill in the second side of the leaf). So, make
your choice, considering what final look you want to achieve.
I
used buttonhole for filling the leaves here:
This
pattern was not yet published. As you can see, the buttonhole filling
does not have to be scarce – try to place the stitches closely
together and they will create a nice solid filling for the shape!
If
you missed previous lessons on Buttonhole you can catch up on these
links:
Look forward to the next week to have the last lesson with a bit of buttonhole
practice :)


No comments
Write what you think! ❤
Note: Only a member of this blog may post a comment.