
Today let's learn 3 stitches together! Don't worry, though, it shouldn't be too overwhelming because all of these stitches are connected by similar elements and thread manipulations, so after learning one, the other becomes clearer :)
So, today's menu is twisted chain stitch, oyster stitch, and rosette chain stitch.
Because there's a lot of information, let's dive right into the tutorials! But first here are the links to some older posts which you might find helpful to understand the current content.
Twisted chain stitch
Actually, if you practiced the Rope stitch before, you will realize that the stitches are very similar. Like, VERY. In fact, they are worked basically the same way except for the distance between the stitches.

1. First, we come up with the needle to the surface of the fabric at the beginning of the bottom line of the stitch (point A). Next, we insert the needle at point B which is a tad above the point A and often is placed a little to the side (to the left in this case), but not necessarily. And we come back to the surface of the fabric at point C, which is lying a stitch length away from A. The needle should be slanted at an angle.

2 Now take the free end of the thread and cover the needle shaft with it tucking it underneath afterwards.

3. After you pull the needle through you will get the twisted chain link. To make a new stitch, insert the needle on the top line again and bring it to the surface of the fabric on the bottom line a stitch length away.

4. The last loop can be anchored with a tiny straight stitch.
So, here is a twisted chain stitch. Its appearance differs drastically from the Rope stitch, yes. But the only difference between them is that in the twisted chain stitch every link is clearly visible as they stand apart from each other. While in the Rope stitch they are smashed together to form a solid raised line.
Twisted chain stitch can be used for the borders or decorative lines, you can actually add beads or knots in the loops or try and whip them with a thread of different color? I wonder how it will look like, I didn't try, to be honest. Well, there are possibilities to modify it further and adjust to your liking or the purpose of the project. But for now, we are moving forward to the next stitch: oyster.
Oyster stitch

1. Oyster stitch has a detached twisted chain link in its core. You might notice in the picture above that the first steps are identical to what we did first for the Twisted chain stitch, just the angle of the picture is different and here I'm working it vertically.
But the actions are the same. We bring the thread to the surface of the fabric at point A, insert it at point B which lies somewhere near to A, and then come back up through the fabric at point C (which is a stitch length away), tucking the thread under the needle shaft from above.

2. Pull the needle through and here is a detached twisted chain stitch. Looks like a fish with its head down and a double fin up, doesn't it?

3. What we need to do now is to slide the needle under the top right “tail” (or “fin” if we use the fish analogy). You can do it with the eye of the needle if you're using a sharp-pointed needle.

4. Pull the needle through.

5. Now insert the needle at the point right on top of the stitch but inside the latest loop you made. As you pull the needle through, don't go all the way – leave enough of thread on the surface of the fabric.

6. Because now we make detached chain stitch (also called lazy daisy)...

7. … anchoring it at the very bottom of the stitch, outside the loops.
So, that's an oyster stitch. It is a detached individual stitch, which can be used as a powder filler (although it's not really that small) but also is often used as a flower petal or bud, or a leaf, or any other oval-shaped element for that matter.
Reminds me of Danish knot in the way that here as well most of the manipulations are worked with needle and thread on the surface of the fabric.
Rosette chain stitch
And now my favorite of the three! Rosette chain – a VERY pretty line stitch, basically consisting of half-oysters we've just learned.
It is totally subjective but this stitch really sets me in a romantic girly mood, haha.

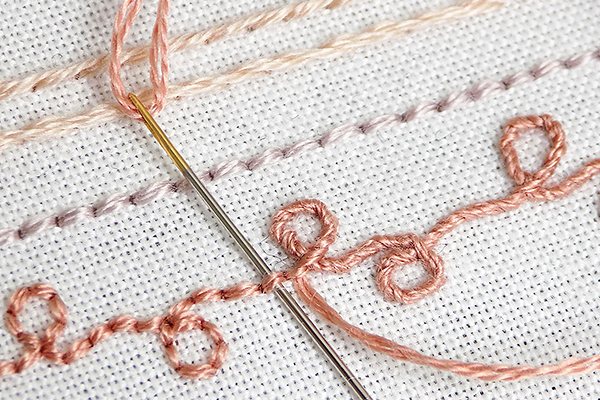
1. We start by making a twisted chain link first – just like with twisted chain stitch, but vertically. Bring the needle to the surface of the fabric on the top line of the stitch, insert it right beside the first point, but a little to the side, and bring it back up through the fabric at the bottom line of the stitch.

2. Now slide the needle under the top right thread...

3. … and pull the needle through.

4. Take a step to the side, insert the needle at the top line, bring it back to the surface of the fabric at the bottom line and tuck the free end of the thread under the needle shaft, covering it first.

5. Now slide the needle under the top right stretch of the thread.

6. Continue working the line following the previous steps...

7. ... and when you come to an end insert the needle at the top line of the stitch.
So, here are our heroes from today's lesson:

Now we have only one stitch left before complete the Chain Stitch family! So see you at the next tutorial :)


No comments
Write what you think! ❤
Note: Only a member of this blog may post a comment.