
Hi there! Hope you had a nice weekend. Mine was not so fruitful, as I fell a bit ill. But now that everything is good, I'm back with a new stitch! Today we are going to look at the Interlaced back stitch.
It is yet another composite stitch and if you understood the principles of working Pekinese stitch that we learned last week, this new one should be a breeze. Actually, sometimes it is even referred to as double Pekinese stitch, so you can already imagine the level of similarity. And, by the way, there is one more name for this stitch: interlaced band stitch.
The stitch we will learn today consists of two parts. The base is two parallel lines worked in back stitch, to which we add interweaving, thus creating a lace band effect. Because the stitch has two elements, it is often worked using two different colors (or even types) of thread.
Also, the back stitch foundation lines are normally straight so you will need to prepare a little for this part. If you're using an evenweave fabric (linen or cotton), then you can work the lines following the holes in it (that's what I'm going to do in the pictures below). Otherwise, you might want to use a ruler and a fabric marker of your choice to draw the lines first and then stitch them. As the lines will be fully covered by the back stitch, you can use even a marker with permanent inks.
Now, after the short intro, let's start.
How to work interlaced back stitch

First, work the top line in back stitch and make your stitches of medium length.

After finishing the top line, start the bottom one but pay attention to where it starts and how the stitches are situated. If you look closely, you will notice that the first bottom stitch starts opposite to the middle of the first top stitch. And so they go further with the ending points of bottom stitches being aligned with the centers of the top ones.
Similarly, when the bottom line comes to an end, make your last stitch end opposite to the middle of the last top stitch.

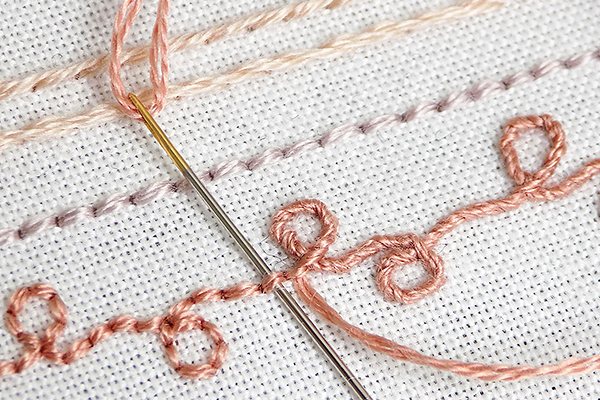
Now, you can take a new thread of the color of your choice. Bring the threaded needle up through the fabric in the middle between the two back stitched lines. Then slide it under the first top stitch from above. As you do that, make sure the needle is covering the floss that is hanging freely where the needle emerged.
Note, that you don't need to take any fabric with your needle – it stays on the surface of the fabric as it slides under the stitch.

Pull the needle through carefully, keeping the tension of the thread rather low and slide the needle under the first bottom stitch from below. Again, note how the needle covers the floss here, keeping it under the shaft.

Pull the needle through and make a new loop on the second top stitch, sliding the needle from above again and covering the floss.

Keep going following the steps from above and you will get a pretty interlaced band-looking embroidered border.

When you finish you can bring the needle down in the middle between the two back stitched lines, to mirror the way you started interlacing.

To further point out the fact that interlacing does not require bringing the needle up and down through the fabric, here's the picture of the backside. As you see, there's only evidence of the back stitch here, and no sign of interlacing whatsoever. That's because when we interweaved the stitches, the needle never left the surface of the fabric. Just the same way as with Pekinese stitch.
So, that's how we work interlaced back stitch! Try it out!
Tips
As for the personal insight... I'd say the most important is to be careful with the tension of the thread when you work the interlacing part. Don't make the thread tight, let it be quite loose for the loops to be relaxed and pretty.
Also, the size and number of the back stitches in the lines will influence the look of the stitch. If you increase the number of back stitches and make them a bit shorter (long enough for the needle the pull through freely though), then the interweaving will be denser.
Ah, one last thing. It is best to use a needle with a blunt point when you work the weaving part, as it minimizes the risk of picking up the floss fibers!


No comments
Write what you think! ❤
Note: Only a member of this blog may post a comment.