
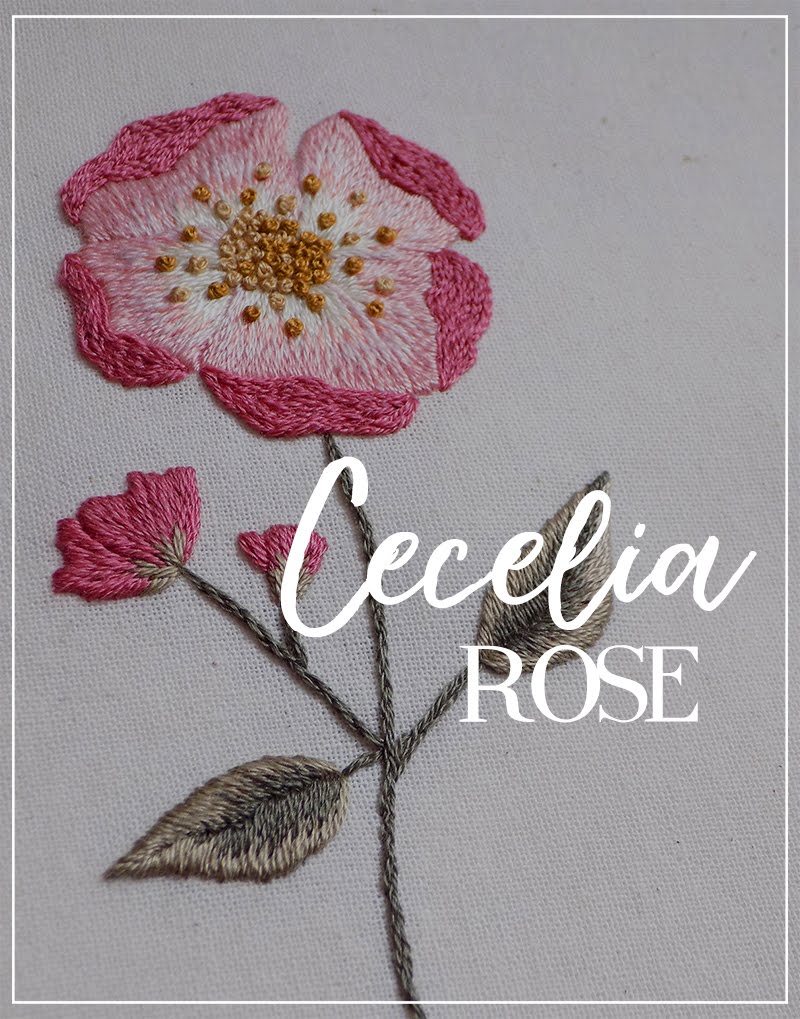
Today is the day! Finally, the first part of the “Cecelia Rose” stitch along. Have you been anticipating? I sure have. So, let's start!
Before we start
Actually, today's step isn't very demanding on time, so I'm sure you can complete it within a day. But since everyone has their own schedules, I stuck with the decision to keep the parts of instructions a week apart. This way, you can have enough time to indulge in stitching and complete the part even if you have only 10 free minutes a day.
Also, I'm happy to say that 45 people have joined this stitch along (excluding me), which means that you are not alone in your questions/struggles. So, please, feel yourself like home, don't hesitate to report on your progress, ask questions and encourage others. We are all in this together!
Lastly, I really want to make a gallery of all your beautiful finished roses when the stitch along ends. So, when we make the last stitch, consider sending me a picture of yours, so that I can post it, and include the links to your blog or social media accounts. Also, don't forget, that on IG we use the #ceceliarose_sa in the posts related to the project. I will check them out and give the shout out here😊
Okay, okay, enough blabbing, we start now.
A little reminder: please, read carefully the instructions and pay attention to the details. For example, how many strands of thread to use. In some places, it will be 1 strand of floss, in some – 2.
I will highlight these places, but still, be on the watch.
I will also be mentioning the color of thread by numbers 1-10 – as is listed in the PDF patterns you received. So, if you see “thread #5” – it means the one listed under number 5 in the PDF file I sent you.
Stem

We work the stem using split stitch, having 2 strands of DMC floss in the needle, color #9 in the PDF pattern. You can read the full split stitch tutorial on the blog if you don't know yet how to work it.
I will remind you: after making the first stitch, we split it from underneath and make a new one. Because we have 2 strands of floss in the needle, splitting previous stitches shouldn't be much of a struggle. The line may seem a bit too thick at first, but it will look natural in the end.

Work all of the lines in split stitch.
Leaves

We are going to use long and short stitch to fill the leaves, but before that – we will outline their shapes with split stitch again. But now, using only 1 strand of floss. I used the same color as for the stem just because didn't want to switch thread, but #8 would do as well. So, you can decide for yourself.

Splitting a single strand of cotton floss might be challenging but it is possible. I actually demonstrated it in the tutorial. Every strand of embroidery floss consists of two fibers, so you can do that, don't worry.
Actually, you don't have to fret about your split stitch looking stunning here, because it has 0 decorative purpose in given situation – we merely use it to raise the edge of the leaf a bit and add dimension to it. We will soon cover it.
Long and short stitching
Now, time to fill the leaves' shapes with some color. Before proceeding with this step I recommend reading long and short stitch lesson and also check out the Needle painting stitch along, especially Part 2 where I shared some extra tips.
From here on, in long and short stitch we use only 1 strand of floss.

Take 1 strand of floss #8 from the pattern and make few stitches to mark the guidelines. There are also guidelines in your pattern, so maybe you've already marked them on fabric as well. If you did and you think they will be enough for you, you can skip this step.

Filling in the gaps between the guiding stitches.

The first row of stitches can be quite long and the “short” stitches don't have to be really short. I mean, personally, I make all of the stitches almost the same length, they will be covered with the next row of stitches anyway.

Working the next row of stitches, thread color #9. Keep your stitches slanted the same way as the first row and now you can vary their length more. You can pierce right through the stitches as you go.

When you're done with the upper side, you can switch to the lower one. We start by filling in a little patch of highlight – take thread #10 from the pattern, only 1 strand. Make guiding stitches and fill the gaps between them. Keep your stitches approximately the same length.

The rest of the first row is stitched using 1 strand of floss #8, the same way.

When the first row is complete...

...we add the darker one, using thread #9 again and varying the length of the stitches.

After you finished, look at our work from different angles. You will notice how depending on the angle the colors blend together beautifully.

Repeat it with another leaf, now you can do it on your own 😊
The areas of color distribution are a bit different, and the other leaf sports only two colors: the lighter #8 and the darker #9.

That's all for today. It's not really much, but if you are new to needle painting it can take time to process and complete it.
It is completely fine if something doesn't work from the first attempt. Unpick your stitches, and try once more. I pick out my stitching sometimes too – it is normal, don't be hard on yourself, you're doing great!
Now, after you complete the first step, hide your embroidery in a drawer, or cover it with a plastic bag or anything else that will protect it from dust and any occasional dirt. Also, if you are not going to leave the Rose in your hoop (I mean, maybe you want to frame it?) then, remove the hoop until the next time you will work on it. We always remove the hoop from embroidery, so that the fabric will rest and the creases won't be too strong - it will be easier to iron them later.
Part 2 is due January 19th. By that time, please, try to complete this step. Firstly, just because it is better to follow the schedule. But mainly, because there will be more of long and short stitching, so it'd be better to familiarize yourself with it by that time. To be more specific – we are going to work the petals, there are 5 of them, so they will likely take more time to complete.
Was everything clear today? Do you have any questions? Ask them in the comments section below or through the blogger contact form. Report your progress on Instagram using #ceceliarose_sa and tag me so I don't miss it! I'm so excited to see your results!
Part 2
Part 3
The pattern is now in Resource Library. You will get a password after signing up to the Newsletter, save it for further use!
Part 2
Part 3
The pattern is now in Resource Library. You will get a password after signing up to the Newsletter, save it for further use!


Muy interesante , me gusta mucho, gracias.....
ReplyDelete