Bullion knots is probably one of the trickiest stitches in hand embroidery. It is surprising that some people might even hate it, while it looks so lovely. But I understand those feelings of frustration. I also struggled with this stitch, getting one messy bullion after another and thinking that something must be wrong with me, my hands or my brain because it looks so easy in diagrams or pictures, but why couldn't I get it right??
I already made a post telling how to make a bullion knot and pistil bullion. But... I thought it is not enough. There are more things that should be shared. In this post I will tell about the alternative way of working the bullion knot which many might find easier, I will also touch on the significance of the direction of wraps around the needle and possible reasons for messy bullions. And in the end you will see a tutorial for the bullion knot rose :) So, let's start!
Needle makes difference
In this post, I already told about the importance of the needle. Basically, if you are struggling with bullion knots – particularly if you can't pull the needle through the wraps, - the first thing you should think about is your needle.
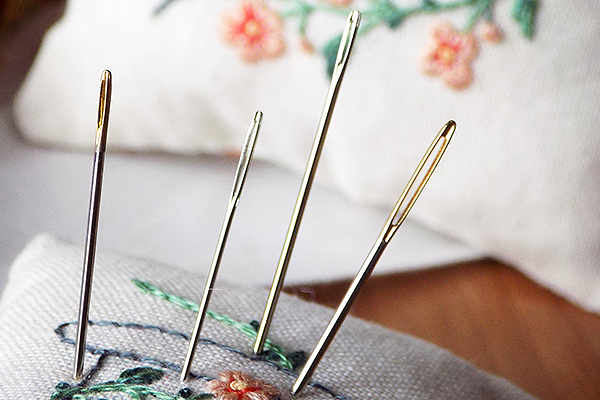
Not every needle suits bullion knots.

In the picture above you can see three needles. The #1 needle is the one that doesn't suit bullion knots, because its eye is too wide. Even if you take a slippery thread, it will still be difficult to pull the needle through the thread twists, because of the difference in the width of the shaft and the eye.
The best choice for bullion knot is the Milliners (Straw) needle – like #3. Its eye is the same width as the shaft, which makes it easy to pull the wraps through. Moreover, it has a long shaft which allows making more wraps.
But, I will be honest – this Milliners needle was found in my family stash, it's old and I have no idea where it comes from. My Mom is not an embroiderer, so it's a complete mystery how it appeared at home (well, I just consider it a miracle). Anyway, the thing is, if I didn't have this needle, I wouldn't be able to source a Milliners needle from anywhere else. They don't sell it in the craft stores in my town and I didn't find it available online in my country.
If you have the same problem and buying from overseas is not an option for you – there is a solution. Just go to your local craft store/needlework store, as for embroidery needles and search for the one with the narrowest eye. The #2 needle in the picture above is not Milliners, but it works fine for making bullion stitches. Its major drawback compared to the Milliners is the shorter shaft. But other than that, it works great.
To conclude: The best and safest needle choice for making a bullion stitch is Milliners (straw) needle. This is almost a guarantee of a successful bullion. BUT if you don't have access to this type of needle, search for the one with the narrowest eye. The narrow eye is what makes the needle fit for bullion stitches.
Two ways of working bullion stitch
The majority of stitches encyclopedias and embroidery books will show you this way of working the bullion knot:

I call it an “official” way of working the bullion stitch. I actually used the same way in my how-to post here. While it is correct, it is a little... hard. Especially when you are using a hoop and your fabric is drum tight. Making the wraps around the needle is really difficult in this case, isn't it?
Well, you could release the fabric from the hoop and fold it.

But there is a better way ;)

Bring your threaded needle up through the fabric at point A, bring it back down at B and then pierce it again at A, bringing the needle up to the top of fabric where it first emerged. If in “official” way we leave the needle on top of the fabric, here, the eye of the needle will be hidden on the backside. We only see the tip of it.

Now, twist the thread around the needle.

The great thing about this method is that the tip of the needle can be moved and bent on either side, so it allows you to check how the length of wraps matches the distance between points A and B.

And here is the ready bullion stitch. If you worked it using the first method you would get the identical result.
Try both variants and choose which one suits you better :)
The direction of twists
Most of us don't stop to think which direction we wrap the thread around the needle – it happens automatically. But it actually makes a difference.
A bit of theory. Any embroidery thread is made of fibers. These fibers are held together by being twisted – either in S direction or Z direction. The majority of threads are twisted in S direction, and some silks and rayons are twisted in Z direction. Why does it matter? Because sometimes it can affect the look of stitches.
In the case with bullion stitches, depending on the direction of the twists, it can look either textured or smooth.

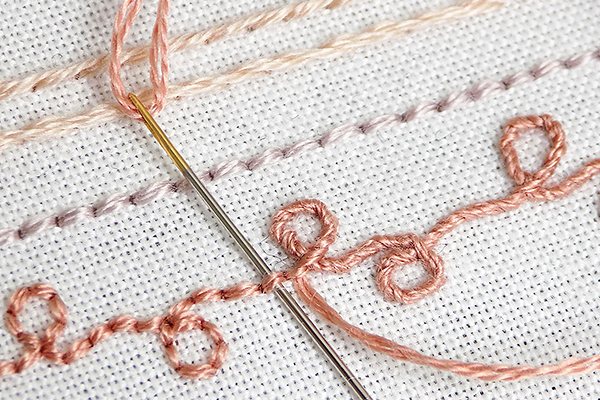
In the picture above you can see the difference. The left bullion knot was stitched in counter clockwise direction. Which means putting thread right on top of the needle from left to right. Because the DMC cotton floss I'm using is twisted in S direction, the twists of the thread are overtwisting, making the wraps distinguishable. The bullion on the right is worked by wrapping the thread around the needle in a clockwise direction – the thread is put under the needle from left to right. This way the twists of thread or “untwisting” and the wraps are not obvious, making the bullion look smoother.
The needle is the same, the method of working the bullion is the same, the thread is the same – the only difference is the direction in which the thread is wrapped around the needle. And look how it affects the appearance of the stitch! It's not a game-changer when you make bullion knots, but it's a good thing to keep in mind if you want a consistent result.
The number of wraps
In some places, instructions say “make 6 twists” or “make 10 twists”. You see, there's no way you know the exact number of twists before making a stitch because it always depends on the distance between points A and B. If your stitch is long 6 twists will definitely be not enough and your bullion knot will come out messy. And if your stitch is short, 10 wraps might be too many, and the bullion will be too raised.
My advice is to try to evaluate the length of wraps by eye. The best formula for a bullion knot is “the distance between A and B + one-two more twists”. One or two twists will not make your bullion raise too much from the surface, will not turn it into an arc. At the same time, if you mistake with your evaluation, these additional twists might make it to the right length.
Another formula is “the less the distance between A and B and the more twists = the higher the bullion arc”.
You can actually make a lazy daisy with bullion knot:

Make the distance between the beginning and end of the stitch very short and make a lot of twists around the needle.

After you pull the needle through your bullion stitch will remind a loop. Anchor it with a straight stitch.

Bullion lazy daisy is ready! It can be used for stitching bullion leaves or petals of flowers and in many other ways.
What can be wrong
There are 4 main tips to making the bullion knot:
- Choose the right needle
- Get the right tension of the twists: it shouldn't be too loose or too tight. The needle should be able to go through them, but at the same time, they should wrap it closely.
- Get the right length of wrapping (see the formulas above).
- Hold the wraps with your fingers as you pull the needle trough them.
If your bullion stitches come out messy, you should make sure you do all of the above. And the picture below might help you identify the problem exactly.

And if the problem is that the needle simply doesn't pull through – the reason is either the wrong needle or the twists are just too tight.
Lastly, here's a tutorial on how to make a bullion knot rose and more. Pin it to not lose! :)